Overview
Shift management allows a fleet manager to control and edit data regarding driver shifts. This includes editing the time spans of shifts, odometer data collected at the start and end of the shifts and modify various default parameters for the shifts that affect the reports. The end of shift and bailment reports are also generated from the shift management screen. Finally all of the shift data (including detail on every job done during that shift) can be exported from this page.
Required Information
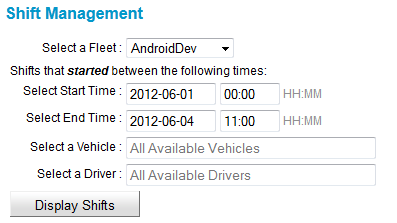
In order to generate any reports or make any changes you will first need to display the shift table. First you need to select the fleet that you want to search for shifts with and then select the time range that you want to display. Note that it will only show shifts that start between the times that you specify.
Next you can select individual vehicles or drivers to display or leaving them will perform a search that will include all the vehicles and drivers.
Once you are happy with the search criteria select the “Display Shifts” button.
Note: It is at the point of first searching across a particular period that the system will auto create the shifts. It is at this point that the ‘fleet defaults’ for shifts are applied to the shifts. The system will use the data collected from the vehicle software (i.e. logons, logoffs, start and end of shift data). The generated shifts can occasionally be wrong if the driver has accidently indicated that a shift should be ‘continued’ when it shouldn’t be but shifts can be edited in these instances.
Results
The results of the search are displayed in a table containing a summary of the data for a shift. These shifts can then be modified or deleted as needed if their data is not correct. Note the check boxes on the left most side of the table. These are used to select particular shifts and are used by the “Generate Bailment” and “Export Shift Data” buttons.
The green check marks show when the system thinks that a particular shift is valid when compared to other shift. I.e. if the shifts were to overlap there will be little yellow warning indicators and moving the mouse over these indicators will give a hint on what the problem was.
Changing Shift Defaults
At the time that shifts are created (either by the system or by a user) they will have the current fleet shift defaults applied to them. These defaults can be changed by an authorised user via Fleet Configuration. If you do not see the option then you are not authorised.
Note: changing the defaults will not change any already created shifts. It will only affect shifts that are created after this point in time.
The parameters in this dialog are described in the “Editing Shifts” section of this documentation below.
Editing Shifts
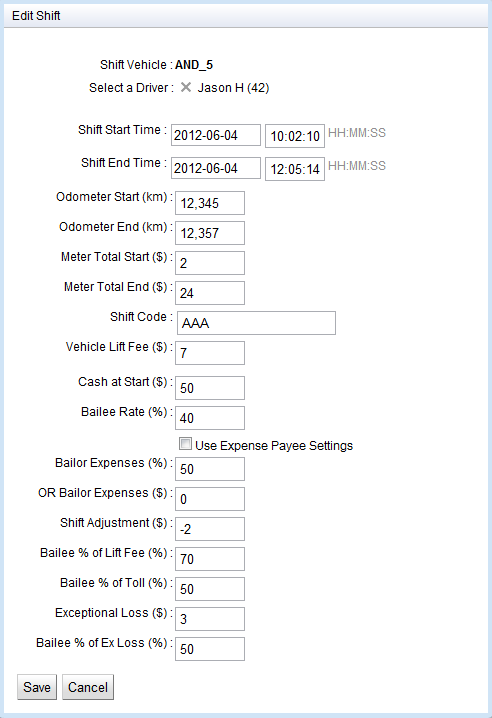
Shifts can be edited by clicking the ![]() icon on the applicable row or by creating a new shift with the “New Shift” button. This will bring up the following dialog containing all of the information about the shift.
icon on the applicable row or by creating a new shift with the “New Shift” button. This will bring up the following dialog containing all of the information about the shift.
Note that bailee generally will mean driver and bailor will generally mean owner.
The following describes the fields and what they do:
| Item | Description |
| Vehicle | The vehicle that this shift was performed in. |
| Driver | The driver that performed this shift |
| Start Time | The time and date that the shift started |
| End Time | The time and date that the shift ended |
| Odometer Start | The odometer reading at the start of the shift. This is used for shift statistics |
| Odometer End | The odometer reading at the end of the shift. This is used for shift statistics |
| Meter Total Start | The meter total at the start of the shift (if a meter is being used) The may be used on the end of shift report to show any discrepancy between what the meter totals were for the shift and what the system recorded for meter totals. A fleet setting “Request Meter Totals” determines whether this is used or not |
| Meter Total End | The meter total at the end of the shift (if a meter is being used) The may be used on the end of shift report to show any discrepancy between what the meter totals were for the shift and what the system recorded for meter totals. A fleet setting “Request Meter Totals” determines whether this is used or not |
| Shift Code | A shift code that is displayed at the top of the shift. This is generally entered by a driver at the start of their shift. A fleet setting “Request Shift Code” determines whether this is used or not for a fleet. |
| Vehicle Lift Fee | This is the amount that is earned for each lift fee for this vehicle. Initially the lift fee amount comes from the fleet property “Vehicle Lift Fee” when the shift is created. (This property can be overridden as a vehicle property if a particular vehicle always needs a different value). Once the amount has been initialised for a shift it can be overridden here if it needs to be adjusted. |
| Cash at Start | The “float” amount that a driver was given to start with. If used it is used by the end of shift report to determine how much cash should be given to the driver at the end of the shift. E.g. if the driver was given $100 at the start of the shift as a float and was owed $120 cash at the end of the shift the report would indicate that another $20 should be paid to the driver. |
| Bailee Rate | The percentage amount that the driver earns from the vehicle takings. |
| Use Expense Payee Settings | This specifies that the expenses should be calculated using the “Initially Paid By” and “Finally Paid By” settings . If unchecked it will assume that the driver was the initial payee and that the final payee will be based on the “Bailor Expenses %” or “Bailor Expense $”) |
| Bailor Expenses % | The percentage amount that the owner pays of the expenses for this shift. Only one of this and the “Bailor Expense $” should be set. |
| Bailor Expense $ | The fixed amount that the owner pays of the expenses for this shift. Only one of this and the “Bailor Expense %” should be set |
| Shift Adjustment | This is an amount for the bailee payment to be adjusted for the shift. This can be used for things just as an amount that should always be deducted from the driver for insurance fee per shift. The name of this adjustment as shown on the end of shift report can be changed using the fleet property “Shift Adjustment Wording”. |
| Bailee % of Lift Fee | The percentage amount that the driver gets of the lift fee (if lift fees are applicable) |
| Bailee % of Toll | The percentage the the driver earns of any tolls that are collected. |
| Exceptional Loss | The exceptional loss specifies any amount that was known to have been lost during a shift. Examples of this would be a passenger running off without paying. |
| Bailee % of Ex Loss | This is the percentage amount of the exceptional loss that the driver incurs. |
Drivers End of Shift Report
If fares are recorded for all jobs it is possible to produce an end-of-shift report that summarises the work done and income earned during the shift. The first page is a financial reconciliation and the second page lists the work done.
These reports can be generated for any shift shown in the table by clicking the “EOS” text link in that row. This will then show a dialog indicating that the report is being generated. Once generation is complete the website will try to open the PDF file in a separate window (Note: this may be blocked by browser pop-up blockers) and the below dialog is displayed. You can open or save the file by right clicking on the text link and choosing the appropriate option.
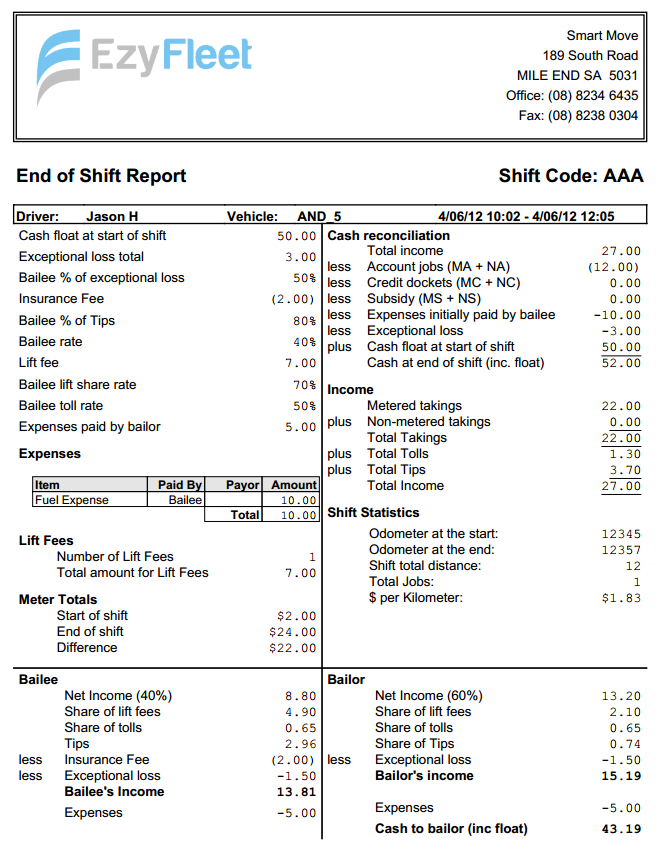
An example of the report that is generated is shown below. Parts of this report are described in more detail below.
Note that his is an extreme example of an end of shift report with various items shown that are rarely used for all fleets. For example if has strange splits for tips, exceptional losses, tolls and includes an insurance fee. In many cases line items will not be shown if there is no amount for them.
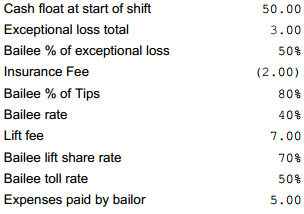
The top right part of the data in the report shows a summary of some of the settings that were used to generate this report. The meanings of these settings were described in the section on “Editing Shifts”.
Expenses are summarised in the expenses table. These are grouped and summed by their different expense type categories
The lift fees (if any) are shown in the next section and the amount that they contributed to the income is shown.
If the fleet has “Request Meter Totals” or meter totals are entered for the shift the “Meter Totals” section will show up. This will show the difference between the meter total at the start and end of the shift and will show a warning message if the difference does not match (within $1) the metered takings.
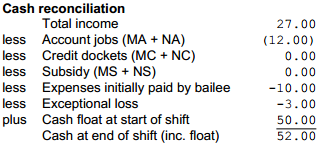
On the top of the right hand side of the shift data is the cash reconciliation. This shows the total takings and then describes the breakdown of those takings into the different forms of payment. These are summarized here but the individual job detail of these payment methods are shown on page 2 under the “Special Jobs” section.
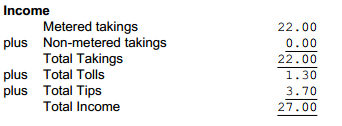
The total income is shown broken down by metered takings and non-metered takings. Non-metered can include things like fixed price jobs. This allows for a comparison with the meter if required.
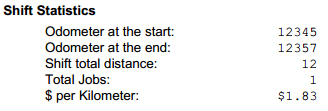
The shift statistics are produced if the odometer readings for the start and end of the shift are specified. This shows a total of the number of jobs done, the distance travelled and the amount of money made per distance. This can be a useful metric for measuring the earning efficiency of the vehicle.
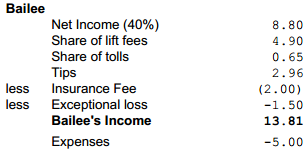
The report on the bottom left shows the drivers income for the shift with a breakdown of the drivers share of the components of that income.
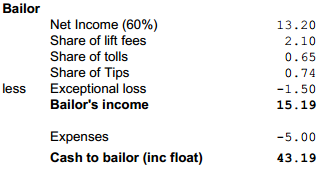
The report on the bottom right shows the owners income for the shift with a breakdown of the owners share of the components of that income.
At the very bottom of the bailor section is a “Cash to bailee” or “Cash to bailor” amount. This amount indicates the systems recommendation of the amount of cash that should be passed to or from the driver. I.e. Assuming that all information has been finalised and is correct then the system calculates that the driver had say $100 cash on them at the end of their shift. The system calculates that they earned say $120 during that shift after expenses, tips etc., then the recommended amount in this section would be to indicate $20 to bailee.
The second page starts with the “Special Jobs” section. This section outlines any amounts paid for jobs that were not “metered cash” jobs. Each of the different categories is described and totalled. This should match the corresponding “Cash Reconciliation” section of the first page of the report.
After the “Special Jobs” section of the report is the “Job Summary” table. This contains a like foe every job that was done during the shift. It provides the booking id, the times of the job and the amounts that were recorded for the fare, extras and toll amounts.
The last column of this table is the “Paid” amount. This is shown as a double check on the amount. In most cases the “Total” should be the same as “Paid” if they are not equal the amount in paid is shown in red font with a grey background. If “Paid” is less or $0 it generally means that the booking has not had the payment method specified. If the “Paid” amount it more it generally indicates that the driver was tipped the difference. A discrepancy here is generally the best indicator of a problem if the totals on the end of shift are not showing what is expected when compared to other totals.
Bailment Report
A bailment report is effectively a summary of selected end of shift reports. This could be for a driver over a period of time, a vehicle for a period of time or even an entire fleet for a period of time.
Bailment reports can be generated for the selected shifts by checking the checkboxes located in the leftmost columns of the shift in the table you need. Once they are selected click the “Generate Bailment” button. This will then show a dialog indicating that the report is being generated. Once generation is complete the website will try to open the PDF file in a separate window (Note: this may be blocked by browser pop-up blockers) and the below dialog is displayed. You can open or save the file by right clicking on the text link and choosing the appropriate option.
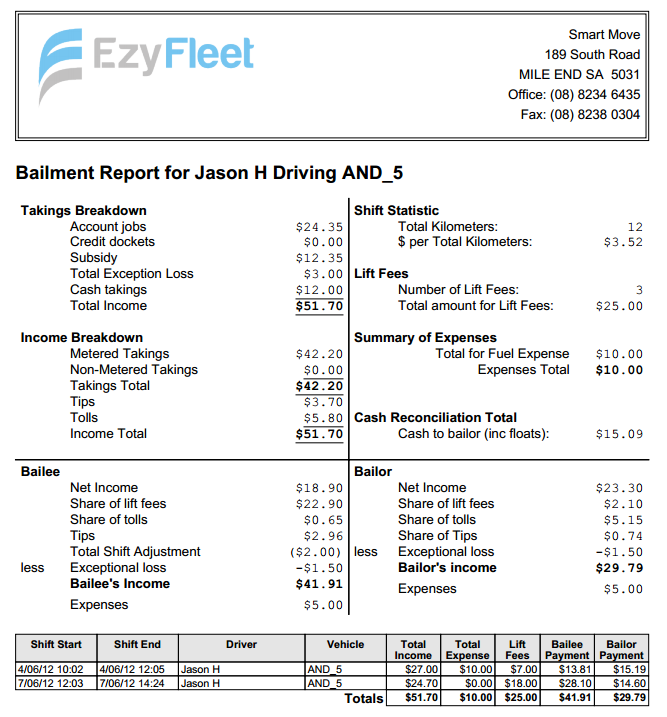
An example of the report that is generated is shown below.
The first page of the bailment report data shows similar information to the top part on the first page of the end of shift report but shows a summary of the data rather than the data for a single shift. Mode detail is given for each of the fields in the section of this documentation that describes the end of shift report. The accuracy of this data depends on each of the included shifts being accurate.
The table below the bailee and bailor section shows a summary line of data for each of the shifts included.
Exporting Shift Data
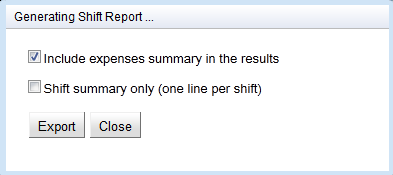
Shift data can be exported using the “Export Shift Data” button. This will export data for all of the shifts that have been selected using the checkbox on the left hand side of the table. When the button is selected a dialog box appears that looks like the below image. There will be 2 options. The first indicates whether expense data should be included in the CSV results.
The second option indicates whether the data should be a summary or the full data. The summary data will only shown one row per shift. The full results will contain one row for every single job in all of the selected shifts. Both of these exports contains a lot of columns of data and this is described below in more detail.
Once generation is complete the website will try to open the CSV file in a separate window (Note: this may be blocked by browser pop-up blockers) and the below dialog is displayed. You can open or save the file by right clicking on the text link and choosing the appropriate option. CSV files may open in Excel or as a web page or as a file that needs to be saved depending on how the browser has been configured to open files of type CSV.
A small example of the data produced is shown below. The data can be manipulated as needed by importing into a spread sheet program (like Excel) or any other tool that can use with the shift or booking level data. The meaning of each of the columns is described in more detail below.
Shift Summary Export Columns
For shift summary data the export will contain the following columns
| Item | Description |
| ID | An id for this shift that is unique across the fleet |
| Vehicle | The vehicle that this shift was performed in. |
| Driver | The driver that performed this shift |
| Start Time | The time and date that the shift started |
| End Time | The time and date that the shift ended |
| Odometer Start | The odometer reading at the start of the shift. |
| Odometer End | The odometer reading at the end of the shift. |
| Exceptional Loss | The exceptional loss specifies any amount that was known to have been lost during a shift. Examples of this would be a passenger running off without paying. |
| Cash at Start | The “float” amount that a driver was given to start with. If used it is used by the end of shift report to determine how much cash should be given to the driver at the end of the shift. E.g. if the driver was given $100 at the start of the shift as a float and was owed $120 cash at the end of the shift the report would indicate that another $20 should be paid to the driver. |
| Bailee Rate | The percentage amount that the driver earns from the vehicle takings. |
| Bailor Expenses % | The percentage amount that the owner pays of the expenses for this shift. Only one of this and the “Bailor Expense $” should be set. |
| Bailor Expense | The fixed amount that the owner pays of the expenses for this shift. Only one of this and the “Bailor Expense %” should be set |
| Vehicle Lift Fee | The amount that this vehicle would earn from each lift fee for this shift (if there are any lift fees applicable otherwise this setting is ignored) |
| Bailee % of Lift Fee | The percentage amount that the driver gets of the lift fee (if lift fees are applicable) |
| Bailee % of Toll | The percentage the the driver earns of any tolls that are collected. |
| Bailee % of Ex Loss | This is the percentage amount of the exceptional loss that the driver incurs. |
| Num Jobs | The number of jobs that were done during this shift |
| Shift Adjustment | This is an amount for the bailee payment to be adjusted for the shift. This can be used for things just as an amount that should always be deducted from the driver for insurance fee per shift. The name of this adjustment as shown on the end of shift report can be changed using the fleet property “Shift Adjustment Wording”. |
| Day of Week | The day of the week for this shift as a 3 character string |
| Shift Code | A shift code that is displayed at the top of the shift. This is generally entered by a driver at the start of their shift. A fleet setting “Request Shift Code” determines whether this is used or not for a fleet. |
| Start Meter Total | The meter total at the start of the shift (if a meter is being used). A fleet setting “Request Meter Totals” determines whether this is used or not |
| End Meter Total | The meter total at the end of the shift (if a meter is being used). A fleet setting “Request Meter Totals” determines whether this is used or not |
| Metered Total | The ‘metered’ amount for this shift. I.e. a meter was used for recording the fare. |
| Unmetered Total | The ‘unmetered’ amount for this shift. I.e. no meter was used for recording the fare so it was either manually entered or was fixed fare work. |
| Total Income | The total amount of income recorded for this shift including any tolls taken or tips received. This is the ‘paid’ amount. |
| Total Tolls | The total amount of tolls taken for the shifts |
| Total Tips | The total amount of tips taken for the shifts |
| Driver Total | The amount of income made by the driver after distribution of expenses, exceptional losses, tolls, lift fees and tips. This should match the end of shift. |
| Owner Total | The amount of income made by the owner after distribution of expenses, exceptional losses, tolls, lift fees and tips. This should match the end of shift. |
| Total on Account | The amount paid on account during this shifts |
| Total on EFTPOS | The amount paid on card during this shifts |
| Total on Cash | The amount paid by cash during this shifts |
| Total on Subsidy | The amount paid on subsidy during this shifts |
| Total on Subsidy | The amount paid on subsidy during this shifts |
Booking Details Export Columns
For shift detail or booking level the export will contain the following columns
| Item | Description |
| Booking ID | The booking ID of the booking |
| Driver | The display name of the driver for this booking |
| Username | The user name of the driver for this booking |
| Vehicle | The vehicle ID of the vehicle for this booking |
| Rego | The vehicle registration of the vehicle for this booking |
| Offer Time | The time that the booking was offered to the vehicle |
| Booked Time | The time that the booking was made |
| Pickup Time | The time that the booking was engaged |
| End Time | The time that the booking was disengaged |
| Pickup Address | The pickup address street or place. This may include “[HAIL]” if it is an estimation of the address from the GPS location of the start of the job |
| Pickup Area | The area name of the pickup location |
| Destination Address | The final address street or place. This may include “[HAIL]” if it is an estimation of the address from the GPS location of the start of the job |
| Destination Area | The area name of the final location |
| Total | The total amount amount for the fare. This is the fare + extras + toll |
| Record Fare | The amount recorded for the fare for this booking |
| Record Extras | The amount recorded fro the extras for this booking |
| Record Toll | The amount recorded for the toll for this booking |
| Bailee Payment | The amount attributed to the bailee for this booking for the total fare |
| Bailor Payment | The amount attributed to the bailor for this booking for the total fare |
| Lift Fee | The amount of the lift fee for this job (will show as 0 for no lift fee) |
| Reference Number | The account or subsidy reference number if one was specified |
| Customer Name | The customer name for this booking if one was specified |
| Prebooked | Whether the booking was ASAP or a pre booking |
| Requested Time | The requested time of the booking if it was a pre booking |
| End Type | The end type of this job (e.g. COMPLETED, CANCELLED, NOSHOW) |
