- Why can’t drivers no-show a prebooked job prior to the scheduled pickup time?
- What do the abbreviations on the Status column of the Vehicle Status panel on the Dispatch Client mean?
- I just updated Java, why doesn’t my Dispatch Client work?
- Can I specify a different reference for an account job in a return journey?
- What algorithm or rules does SmartMove use when dispatching jobs?
- Why won’t a booking dispatch to a car?
- Why can’t the driver see future jobs on his/her screen?
- How do I delete a user (e.g. drivers & operator) from the system?
- Why isn’t the car collecting fares? Why is the fare amount $0.00 at the end of a job?
- When I modify a Model booking, why aren’t the updated details reflected in the Recurring bookings that are already in the Pre-Bookings queue?
- How can I encourage my drivers to go back to the rank?
- How can I prevent SmartHail (or Branded) app users from creating a booking from the Airport?
- What is the correct way to enter a DVA booking so that I can easily produce and upload the invoice to the DVA Portal?
- How does accepting the job offer via the SmartDriver app actually work?
Question: Why can’t drivers no-show a prebooked job prior to the scheduled pickup time?
Answer:
Recently, at the request of a few fleets, we implemented a feature whereby a driver would not be able to no-show a prebooked job unless they were at the pickup location and it was after the scheduled pickup time.
Some fleets allowed their drivers to no-show jobs at anytime and so we have made this feature configurable.
To allow drivers to no-show prebooked jobs, set the fleet property No Show Wait Until Pickup Time to N. To disallow drivers to no-show prebooked jobs, set the fleet property to Y. The default setting is Y.
Question: What do the abbreviations on the Status column of the Vehicle Status panel on the Dispatch Client mean?
E.g. 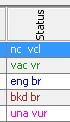
Answer:
The Status column shows the current status of the vehicle. The information is shown in two parts. The first shows the status and second shows any flags. These are summarised below:
| Status | Colour | Comments |
|---|---|---|
| nc | Black | Vehicle is not connected to server |
| log | Purple | Driver is logged out |
| una | Pink | Driver is logged in but is unavailable for work |
| vac | Green | Vehicle is vacant and eligible for work |
| bkd | Brown | Vehicle is booked with a job dispatched through SmartMove |
| eng | Blue | Vehicle is engaged (either using the meter or the Start Job button) |
| pen | Pink | Driver is being penalised. |
| pan | Red | The panic button has been pressed |
| lck | Pink | Driver has been dispatch locked |
| loc | Gray | Cannot determine vehicle’s location. The vehicle may have a problem with GPS |
There are a number of flags which are displayed next to the status to provide additional information:
| Flag | Comments |
|---|---|
| b | Vehicle is booked with a job dispatched through SmartMove |
| c | Vehicle is not connected to the server |
| e | Vehicle is engaged with a HAIL job (either using the meter or the Start Job button) |
| g | Vehicle is connected to the server but does not have a valid GPS location |
| k | Driver has been dispatch locked |
| l | Driver is not logged in |
| o | Driver is out of car |
| p | The panic button has been pressed |
| r | Driver has registered for cover work |
| u | Driver is logged in but is unavailable for work |
| v | Vehicle is vacant and is available for work |
| x | Driver has been penalised |
Question: I just updated Java, why doesn’t my Dispatch Client work?
Answer:
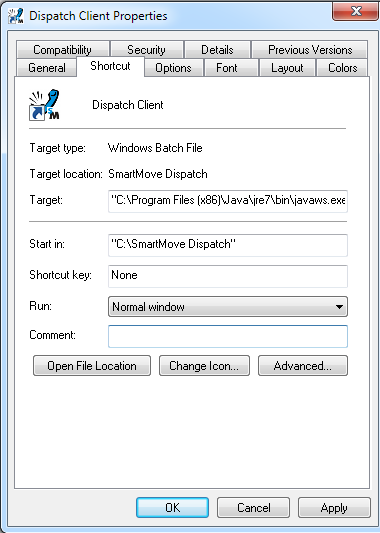
The Dispatch Client is run via a shortcut on your Desktop. The shortcut specifies the location of the file javaws.exe, which the Dispatch Client requires to run. When you installed the latest version of Java, the installer may have put the location of the file javaws.exe into another location. What you need to do is change the shortcut to point to the new version of javaws.exe. To do this:
- Using Windows Explorer, locate where Java is installed. This is usually C:\Program Files (x86)\Java\jre7\bin. It may be different on your system.
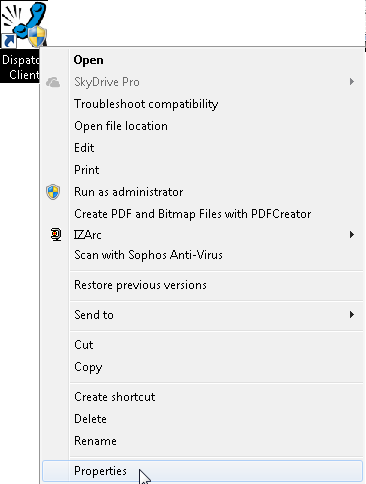
- Right-click on the Dispatch Client shortcut and select the Properties menu item.
- In the Target field of the Shortcut tab, replace whatever is before the \javaws.exe http:\\ with the location of Java. The target should now look like“C:\Program Files (x86)\Java\jre7\bin\javaws.exe” http://dispatchclient…Notice that the path to javaws.exe is enclosed in double quotes.
- Click on the Apply then OK buttons.
- Start the Dispatch Client by double-clicking the shortcut.
Question: Can I specify a different reference for an account job in a return journey?
Answer:
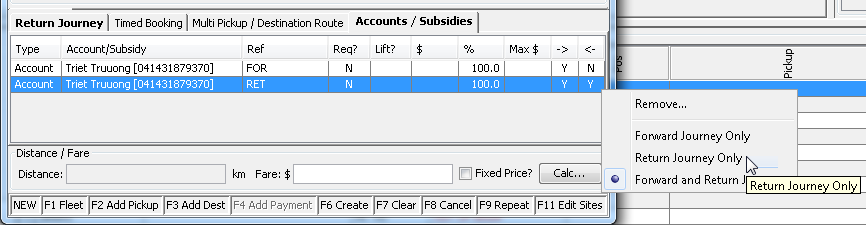
You can specify multiple payment methods for a single job. In this example, for the forward journey you can specify an account and a reference number and specify the same account with a different reference number for the return journey.
The main things to remember are:
- Once you have specified an Account and Reference, press the F4 key to add a payment method for the forward journey.

- Similarly for the return journey, press the F4 key once you have specified an Account and Reference for the return journey.
- In the Accounts / Subsidies tab right-click the first (forward) payment then select the Forward Journey Only menu item (the -> and <- represents the forward and return journeys respectively).
- Similarly, right-click the second (return) payment then select the Return Journey Only menu item.
Please note that the Fleet property Enable Multiple Accounts And Subsidies needs to be set to Y.
Question: What algorithm or rules does SmartMove use when dispatching jobs?
Answer:
Some users have asked for clarification of the rules/algorithm used to allocate a job to a car. When a job is entered the steps involved in finding a car are given below:
- Step 1 – SmartMove will look for the closest suitable car
- This applies only if the No Location Check option is set when creating the booking.
- If there are several cars in the same zone that are within 500m of each other the one with the lowest queue position will be offered the job. An example of this is when several cars are on a rank and the one at the back is closer – the job will be given to the one vacant longest in the zone.
- Step 2 – SmartMove will look for a suitable car in the same zone the pickup is in
- The job is given to the car that has been waiting longest in that zone. This is effectively the queue position.
- Step 3 – SmartMove will hold the job for a car if that car has plotted to the pickup zone (PLOT HOLD)
- If another suitable car becomes available in the pickup zone then the PLOT HOLD will be cancelled and the job will be offered to that suitable car. SmartMove will not send an empty car into the pickup zone.
- When the car that has plotted into the pickup zone clears its meter, the job (that was held for that car) is released and dispatched using these rules resulting in the job being offered to the car that just cleared (Step 2). However, if the car cleared in some other zone then the job may go to some other suitable car.
- Step 4 – SmartMove will search the layers
- Taking each layer in turn SmartMove will look for the car that has been waiting longest in the combined zones.
- This may result in a job being offered to a car that is further away from the job than is set on the cover screen.
- Step 5 – SmartMove will search for a car registered for cover work
- The job will be offered to the ‘closest’ suitable car that is prepared to travel to the job.
- For the purpose of this calculation the distance is the straight-line distance to the car less 1km for each 5 minutes that the car has been vacant.
- A car will be given the job only if the straight-line distance from the car to the job is no more than that specified by the driver.
- This is the only time the distance set by the driver on their cover screen is used.
- Step 6 – SmartMove will put the job on cover
- The job will be put on the cover list and SmartMove will wait for a suitable car to become available.
Note: A suitable car is one that is vacant and has the right attributes for that job.
Question: Why won’t a booking dispatch to a car?
Answer:
There are a number of reasons. The most common ones are:
- For prebookings, it was manually assigned to a vehicle that is not on the road or to a driver that is not logged in.
- There are no eligible cars. Eligible means a vacant car with the right attributes.
- Eligible cars are sitting outside of the zone layering AND have their cover distance is set to a short distance or No Cover.
- Auto Dispatch was turned off for that booking.

- There is a current blacklisting for that customer. To check, right-click on the job that’s on cover and select the Check for Blacklist menu item.
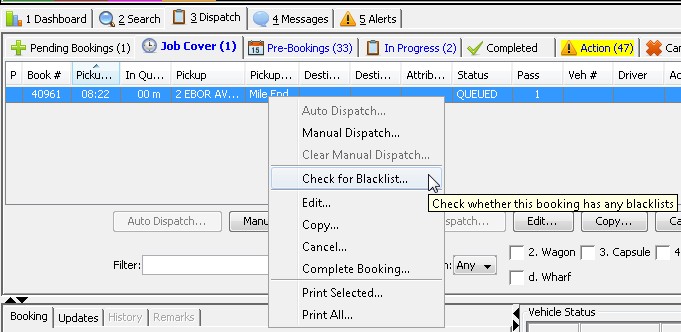
If a job is not dispatched for an extended period, it will move from the Job Cover queue into the Action queue for the operator’s attention (see example of 47 bookings in the Action queue in picture above). This period is set by the Period Move to Action fleet property.
Question: Why can’t the driver see future jobs on his/her screen?
Answer:
The driver must have a pin/password set. To set a pin:
- The driver can set one themselves by entering a pin when they log in. The pin must be used from then on to log into the screen. The same pin is also used when logging into the driver’s website to obtain their End of Shift Reports.
- The base can set one on behalf of the driver. Remember, the pin must be numeric (no letters).
Question: How do I delete users (e.g. drivers & operators) from the system?
Answer:
You can’t delete users – you can only remove their access, so history for that user is kept. Removing their access will prevent them from showing up as a user in your fleet. Only Fleet Managers that have the authority to Manage All Users are able to remove a user.
To remove a user:
- Under User Management display the properties for the user.
- Click the User Authority tab.
- Click the Add / Remove Fleet Access button.
- Untick you fleet’s checkbox.
- Click the Save button.


Question: Why isn’t the car collecting fares? Why is the fare amount $0.00 at the end of a job?
Answer:
If you notice that it only happens intermittently, it’s likely the driver has not logged into the EFTPOS terminal.
SmartMove can be configured so that at the end of every job, it:
- Asks the meter what the fare is (if the EFTPOS machine is not physically connected to the meter); or
- Listens in on the communication between the meter and physically connected EFTPOS terminal and retrieves the fare.
- Click the Save button.
For the latter to work, the driver needs to log into the EFTPOS terminal.
One of the benefits of SmartMove is the ability to collect fares at the end of every job.
- For drivers, this eliminates the need for handwritten job sheets;
- For owner/operators, this helps determine how much to pay drivers and highlights potential fraud; and
- For the base, this makes issuing invoices to Account customers less time consuming.
For these reasons, we encourage all fleets to connect the meter to SmartMove and implement DocketKiller.
Question: When I modify a Model booking, why aren’t the updated details reflected in the Recurring bookings that are already in the Pre-Bookings queue?
Answer:
Changes to a Model booking will only be reflected when new recurring bookings are created. Bookings already in the system are not modified and will have to be updated manually.
Tip:
The number of days in advance recurring bookings are created is specified by the fleet property Period Scheduled Release Days. The default value is “7” which means recurring bookings are created 7 days in advance.
Don’t make this number too large. For example, if the value is set to “30” and you modify a model booking, you will need to manually update affected bookings already in the system up to 30 days in advance.
Question: How can I encourage my drivers to go back to the rank?
Answer:
You specify that jobs in surrounding areas search for taxis on the rank first.
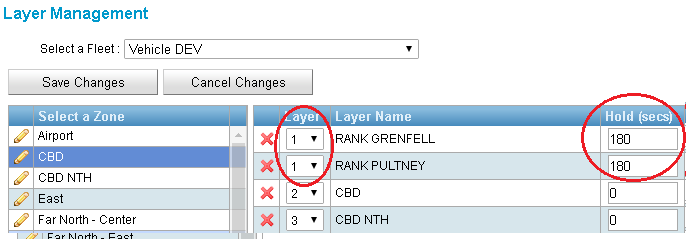
This is done through Layer Management by setting the rank zone as the first layer to search.
Let’s look at an example. The picture below shows a zone called “RANK GRENFELL” surrounding a taxi rank within the larger CBD zone. There are other taxi rank zones scattered around the CBD.
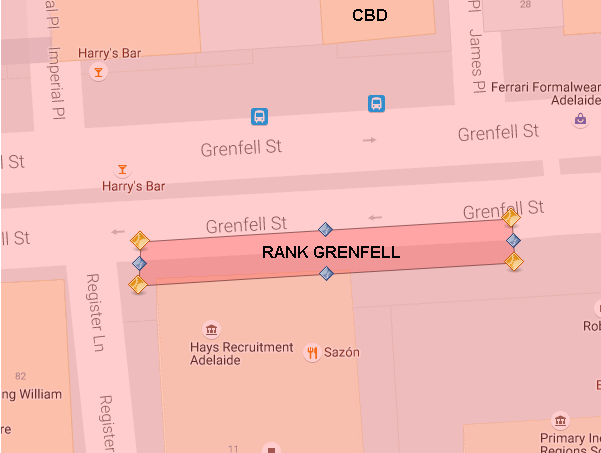
In Layer Management, the first layer for the CBD is RANK GRENFELL and RANK PULTNEY (another rank zone).
This means that when a job within the CDB comes up, SmartMove will search for cars that are in RANK GRENFELL and RANK PULTNEY zones first and offer it to car that has been waiting the longest in those two zones.
Notice that we’ve also specified that SmartMove should wait for 180 seconds (3 minutes) for cars to enter the zones before searching through the next layer (CBD then CBD NTH).
Question: How can I prevent SmartHail (or Branded) app users from creating a booking from the Airport?
Answer:
Set the app “serviceability” of the Airport zone.
In metropolitan cities and larger regional towns, taxi ranks usually have cars waiting for passengers so you may not want app users create a booking from the Airport.
This is done through Zone Editor by setting the serviceability of the Airport zone to “Serviceable destination”.
This tells SmartHail to reject the booking if the pickup is FROM an address within the Airport zone but allow the booking if the destination is TO an address within the Airport zone.
Things to consider:
- If you don’t have an Airport zone currently, you may wish to add one. We’ll help you with this.
- If you currently have a big airport zone that includes hotels and other businesses, you may wish to create a small Airport rank zone where passengers usually get picked up or dropped off.
As a reminder, the app serviceability options are:
- Not Serviceable – an app booking cannot be created for an address in this zone;
- Serviceable – an app booking can be created for an address in this zone;
- Serviceable destination – an app booking can be created if the destination address is in this zone;
- Serviceable pickup – an app booking can be created if the pickup address is in this zone;
- Limited service – an app booking can be created in this zone ONLY if another address in the booking is in a “Serviceable“ zone;
- Limited pickup – an app booking can be created if the pickup address is in this zone and the destination address is in a “Serviceable” zone; and
- Limited destination – an app booking can be created if the destination address is in this zone and the pickup address is in a “Serviceable” zone.
Question: What is the recommended way to enter a DVA booking so that I can easily produce and upload an invoice to the DVA Connect online portal?
Answer:
The DVA online portal allows you to upload a spreadsheet of jobs that also act as an invoice from you to the DVA. The format and content of the spreadsheet is very strict and must not contain any deviation otherwise the spreadsheet will be rejected.
One of the many benefits of SmartMove is that you can generate this invoice with very little effort – so long as the information entered into the booking is correct.
Below is the recommended way of entering DVA bookings so that the invoice can be generated without any errors. Let’s take the situation where an Outbound and Inbound (return) journey is requested.
Prerequisite – all Areas need to be assigned a postcode. This can be done using F11 – Manage Streets, Areas and Places in the Dispatch Client.
1. Ensure that the passenger’s DVA client number is appended to their name. The name of the passenger must in the the format like “JOHN SMITH NX123456”.
- If it doesn’t already exists, create a Dept. Of Veterans’ Affairs account.
- Ensure the Additional Account Fields account property is set to have a value of “Appt Time (24hr format)”. Note, the value can be set to anything so long as it identifies the fact that the field must contain the appointment time in 24hr format. When creating the DVA booking, the appointment time, in 24hr format will be set in this field.
- If you are authorised to charge an Administration fee, set either the Account Service Fee [Fixed Fee, Percentage, Period Fixed Amount] properties appropriately. For example, if you are authorised to charge a 2.5% administration fee, then set the the Account Service Fee Percentage property to “2.5”.
- If it doesn’t already exists, create a model booking for the DVA client.
- Ensure the Name field is set in the following format “First Name Surname DVA Client No.” E.g. “John Smith NX123456”.
Other fields that you can fill in include the Phone number, Pickup and Destination addresses and setting the Payment method to charge the DVA account.
- Ensure the Name field is set in the following format “First Name Surname DVA Client No.” E.g. “John Smith NX123456”.
- When you receive a DVA booking, find the model booking in the Model tab of the Dispatch Client.
- Right-click on that model booking and select “New from Model”. This will bring up a booking form with most of the details pre filled in.

- Click the … button next to the Reference field. Enter the outbound appointment time, in 24hr format, and DVA booking number in the Appt Time (24hr format) and Reference fields respectively.

- When the details are correct, press the F4 key on the keyboard to associate a payment to the outbound journey.

- If a right of return is specified, click the Return Journey tab, then check the Return Journey checkbox and uncheck the Auto Dispatch checkbox. Unchecking the Auto Dispatch checkbox creates the return journey immediately so that it stays in Job Cover so an operator can dispatch it when the inbound return journey is required.

- In the Payment section, specify the DVA account again and click the … button next to the Reference field. This time only enter the inbound DVA booking number in the Reference field only. Leave the Appt Time (24hr format) field blank.

- Press the F4 key on the keyboard to associate a payment to the inbound journey.
- Associate the first payment to the outbound journey by right-clicking it and select on the first payment and select Forward Journey Only menu item.

- Associate the second payment to the inbound journey by right-clicking it and select on the first payment and select Return Journey Only menu item.

- Press F6 on the keyboard to create the bookings (forward/outbound and return/inbound journeys).
- Right-click on that model booking and select “New from Model”. This will bring up a booking form with most of the details pre filled in.
- Generate the DVA invoice
- Select the DVA Format Data option.

- The DVA export should look similar to:

Check the fields before submitting as the DVA portal is very strict with data validation. The invoice will be rejected if there is even a slight error.
- Select the DVA Format Data option.


Question: How does accepting the job offer via the SmartDriver app actually work?
Answer:
In short, accepting the job offer on the SmartDriver app gives the driver additional time to go to their car and actually accept the job offer on their screen.
This is done deliberately as we believe the driver is likely to be ready to do the job once they are in the car.
If drivers were allowed to actually accept a job offer via the app when they are out-of-car, it might be several minutes before they, say finish their lunch, leading to unnecessary delays in picking up the customer.
As a reminder:
- When a driver is in-car, they usually have 15s to accept a job offer (specified by the Accept Time fleet property).
- If the driver is out-of-car, they usually have more time, usually 60s, to accept a job offer. This is so drivers who don’t use the SmartDriver app will have time to get back to their car to accept the job offer on the screen (specified by the Accept Time Out-Of-Car fleet property).
- If the driver accepts the job offer via the SmartDriver app, they may have additional time to get to the car and accept the job offer on the screen (specified by the Driver App Extended Offer Time fleet property).
Note, the properties mentioned above are all configurable via Fleet Configuration so you can modify them to suit the way your fleet operates.
There are additional benefits for drivers’ to using the free SmartDriver app (available for iOS and Android devices) so we encourage you to promote the app to your drivers.