The Operator can use the messaging tab to send messages to Drivers. Drivers that are currently logged in will receive the message immediately while Drivers not currently logged in will receive the message once they do log in. Drivers are able to respond (although their response is limited to a Yes/No answer).
If there is a message for the operator the “Messages” tab will flash yellow.
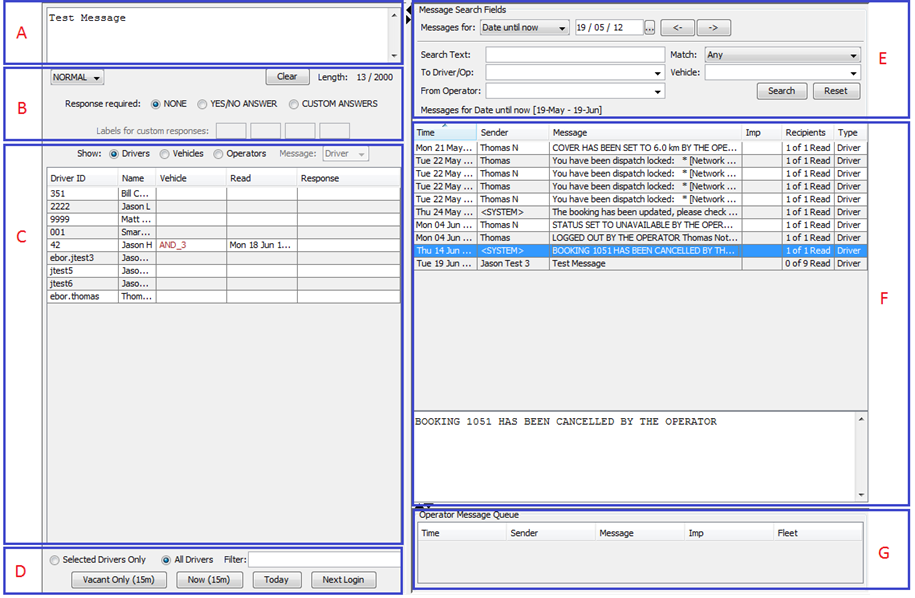
The Taxi Message dialogue is divided into several areas. The fields in each area are marked with letters above and will be described in detail below:
Section A – Message Text
This area contains a field where the Operator can enter a message. The message can be up to 2000 characters long. As the Operator types in a message, the number of remaining characters is indicated by the Length field in the Message Options area.
Typical messages include “Job to Melbourne, who wants it?” “Return to base” and “Lot’s of jobs up north, head up there”.
Section B – Message Options
This area allows the Operator to specify the client details including the account that will be billed.
- Importance: Select the importance of the message from the available list. The list may include:
- NORMAL: the Envelope icon on the vehicle device will continuously flash. The device will beep every 30 seconds until the driver reads the message. If the Driver happens to be viewing a message, the Mailbox will be refreshed with the new message automatically and the device will beep once.
- URGENT: the Envelope icon on the vehicle device will continuously flash. The device will beep every 5 seconds until the driver reads the message. If the Driver is currently viewing another message, the Mailbox will be refreshed with the new message automatically and the device will beep once.
- Clear: This will clear the text that has currently been entered in the message text section
- Length: this field shows the number of characters of a message, and is updated as the Operator types the message. The fixed number (1000) is the maximum number of characters for a message.
- Response Required: whether a response from the Driver is required or not.
- NONE: select this option if no response from the Driver is required. This option on selected by default.
- YES/NO ANSWER: select this option if the Driver is required to responds to a message. The driver will be presented with Yes and No buttons with which one must be pressed. If the message was sent in Normal mode, the vehicle device will continue to beep every 30 seconds until the Driver has responded to the message and likewise, every 5 seconds for Urgent messages.
- Custom Answers: select this option if you want the driver to respond to the message but with a different set of answers than just yes or no. Clicking this option will enable the “Labels for customer responses” fields. If the message was sent in Normal mode, the vehicle device will continue to beep every 30 seconds until the Driver has responded to the message and likewise, every 5 seconds for Urgent messages.
- Labels for customer responses: These fields will only be enabled if “Custom Answers” is selected above. This will allow the Operator to select up to 4 custom answers that the driver will be able to choose from when answering the message. Each of these answers can be up to 4 characters long.
Section C – Message Selection List
This area contains a radio selection list that allows drivers, vehicles or operators to be displayed in a table. This table is used to select the list of users or vehicles that a message will be sent to.
There is also a drop down list that is enabled when the “Vehicles” radio button is selected that allows you to specify who the messages are going to be sent to. I.e. you could specify the vehicles that the message will be sent to be indicate that the message should be delivered to the current driver of that vehicle, not just any driver that happens to be in that vehicle when the message is sent.
The table consists of 5 columns. These are described below:
- Vehicle: shows the Vehicle identifier.
- Driver: shows the display name of the Driver.
- Status: the status of the Vehicle. These are the same statuses described in the dispatch tab documentation.
- Read: a date will be displayed if the Driver has read the message selected in the history table.
- Response: the response received from the Driver from a message requiring a response as selected in the history table.
Messages can be sent to one or more Drivers. Multiple Drivers can be selected using the CTRL and/or SHIFT keys. For example if a messages is to be delivered to the 2nd, 4th, 5th 6th and 7th Drivers in the list, then the Operator should select the 2nd Driver, press and continue to hold CTRL, select the 4th Driver, press and continue to hold SHIFT, the select the 7th Driver.
Section D – Sending Options
This area allows the Operator to specify what group of Drivers will receive the message. Firstly there is an option to choose “Selected Vehicles/Drivers/Operators Only” or “All Vehicles/Drivers/Operators”. This refers to the items that have been chosen in the message selection list. The message selection list can also be filtered by typing text into the “Filter” field.
The use of the buttons is described below.
- Vacant Only (15m): enabled when a message has been entered in the Message Text area and All Vehicles/Drivers is selected, pressing this button will send a message immediately to all Drivers that are currently vacant or will become vacant in the next 15 minutes. For example, a Drivers that log in within 15 minutes and flag themselves as vacant will receive the message so will Drivers that are currently engaged but will finish the job within the next 15 minutes. Typical use of this button might be “volunteer” jobs.
- Now (15): enabled when a message has been entered in the Message Text area and at least one user has been selected, pressing this button will send a message immediately to selected Drivers, regardless of their status. The message will be valid for the next 15 minutes so Drivers that log on within that timeframe will receive the message.
- Today: enabled when a message has been entered in the Message Text area and at least one user has been selected, pressing this button will send a message immediately to all Drivers. The message will be valid up until midnight so Drivers that log in before then will receive the message.
- Next Login: enabled when a message has been entered in the Message Text area and at least one user has been selected, pressing this button will send a message immediately to all Drivers. The message will remain valid until every Driver has logged in so Drivers that log in after a few days/months without using the system will receive the message.
Section E – Message Search Fields
The message search fields allow the Operator to search and filter the messages that appear in the history table. This can help them find a particular message or response to that message easily. The following fields can be used for the search:
- Messages for : this provides some options for selecting date ranges. The following are the available options
- Last 24 hours: Show all messages that have been sent in the last 24 hours
- Last 7 days: Show all messages that have been sent in the last 7 days
- Date until now: Show all messages from the date specified until the current time.
- Approximate Date: Show all messages for a 3 day span around the specified date.
- Selected Date: Only show messages for the specified date
- Date: The date that is used for the search can be specified in the date text field.
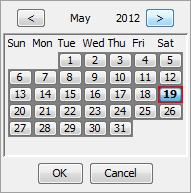
A calendar can be display to select a date from by clicking the “…” button.
The arrow buttons (<- and ->) can be used to move the date by one day in the direction of the arrow.

- Search Text: Typing text into this field will filter the history result to only results that contain the text in the “Message” column.
- To Driver/Op: This is a type ahead field that will filter the list to only those messages that were sent to a driver where their display name contains the text specified
- From Operator: This is a type ahead field that will filter the list to only those messages that were sent from an operator where their display name contains the text specified
- Match: Whether the search only finds messages that were sent to a specific target (Driver, Vehicle or Operator) or any target.
- Vehicle: This is a type ahead field that will filter the list to only those message that were sent to a vehicle where their name contains the text specified
Section F – History
This area allows the Operator to view a history of messages that was sent. After selecting a date or range of dates using the “Message Search Fields”, all the messages sent during that period will be displayed in the history table. Selecting a particular entry in the table will display the message.
The table consists of six columns. These are described below:
- Time: shows the time and date of the message was sent. This will always be in 24 hour format.
- Sender: shows the name of the Operator that sent the message. If the message was sent by the system, “<SYSTEM>” will be displayed in this field. System messages include bookings that have been cancelled by the Operator.
- Message: the message that was sent. IF the message is longer than the width of the column, the message will be appended with an ellipses (…). Hovering the mouse cursor over message will display the message as a tool tip as one continuous string, i.e carriage returns are not taken into account.
- Imp: the importance of the message. For message of NORMAL importance, this filed will not be populated.
- Recipients: Shows a summary of the recipients of the message and the responses if applicable. Hovering the mouse cursor over this item will give more details on all of the recipients rather than a summary. The following are some of the possible entries in this column:
- x of y Read: this means that x out of y Drivers have read the message. Hovering the mouse cursor over message will display a comma separated list of Driver that the message was sent to and those that have read the message will be highlighted bold.
- (NO RESPONSE): this means that only this Driver was sent the message and the Driver has not responded to a message that requires a response. Hovering the mouse cursor over message will display the display name of the Driver. If the Driver has read the message the display name will be highlighted bold.
- YES: this means that only this Driver was sent the message and the Driver has responded YES to a message that requires a response. Hovering the mouse cursor over message will display the display name of the Driver highlighted bold green.
- NO: this means that only this Driver was sent the message and the Driver has responded NO to a message that requires a response. Hovering the mouse cursor over message will display the display name of the Driver highlighted bold red.
- YES =x; NO = y; UNR =z: this means that multiple Drivers were sent the message and x number of Drivers have responded YES and y number of Drivers have responded NO while z number of Drivers have not responded to a message that requires a response. Hovering the mouse cursor over message will display the display name of the Drivers. Those that have read the message will be highlighted bold. Those that have responded YES will be highlighted bold green while those that have responded NO will be highlighted bold red.
Message: when an entry in the history table is selected, the message is displayed in this field. It will display the message as typed by the Operator including showing carriage returns.
Section G – Operator Message Queue
The operator message queue will show any messages that have been sent to the operator that they have not yet responded to.
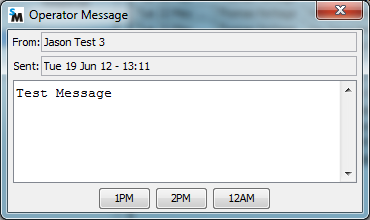
To view a particular message click on that row and select the “View” button. A new dialog will be shown that contains the details of the message. This may include buttons that allow the Operator to respond to the message. An example of “Custom” responses are shown below for responses of “1PM”, “2PM” and “12AM”. Clicking the response button (or “OK” if no response is required) will remove the message from the operator message queue and move it into the message history table.


