test content test content test content test content test content test content test content test content test content test content test content test content test content test content test content test content test content test content test content test content test content test content test content test content test content test content test content test content test content test content test content test content test content test content test content test content test content test content test content test content test content
Category Archives: Uncategorized
test title
test content test content test content test content test content test content test content test content test content test content test content test content test content test content test content test content test content test content test content test content test content test content test content test content test content test content test content test content test content test content test content test content test content test content test content test content test content test content test content test content test content
Tips and Tricks
- Clearing “Stuck” Jobs
- How do I apply an automatic discount for certain jobs
- Adjusting Reject/Resubmit penalties for individual zones
- Adjusting Reject/Resubmit penalties for individual attributes
- Procedures for producing correct DVA invoices that includes a payment for lifts
- Obstacle Zones
- Contains Search Mode
- Common mistakes with Recurring bookings
- Send email reminders to Owners/Operators when Requirements are nearing expiry or have expired
- Apply penalties for rejecting and resubmitting jobs offered via cover
- How to give “duty” cars first dibs at jobs
- Email SPF Record
- Search jobs that took a long time to service
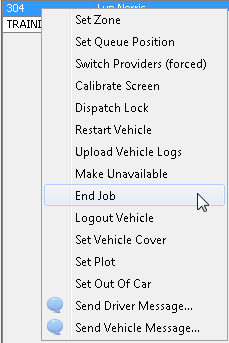
Tip 1: Clearing “Stuck” Jobs
On very rare occasions SmartMove does not record that a job has been completed. This happens when a job is started with the meter but SmartMove does not get the corresponding end-of-job message from the meter. Often a wiring fault or a faulty meter is the cause.
the operators have the ability to mark a job as having been completed. Right-click on the car in the Vehicle Status list and select the End Job menu item.
Tip 2: How to apply an automatic discount for certain jobs
Your fleet may offer discounts for certain trips. How do you ensure that the discount is automatically applied at the end of the trip? It’s easy with SmartMove!
Let’s use the example of a 10% discount for a trip to or from the airport. There are a few “once-off” steps you need to do.
1. Create an “Airport Discount” account
- On the Fleet Management Website, select Add/Edit Accounts.
- Create a new account by pressing the New Account button.
- As this is only to be used internally, set the Cust Acct Num field to say “0000”.
- Set the Account Name field to “Airport Discount”. Of ‘course, you may use whatever name you desire.
- Set the Account Maximum Percentage of Fare property to “10”.
- Save your changes by pressing the Save button.
2. Create an address qualifier for the Airport address
See this link for detailed instructions on how to put in address qualifiers.
- If the pickup or destination is the Airport, make a note to the operator reminding them to specify that part of this fare is to be applied to the “Airport Discount” account.
3. Creating the booking
When an operator creates job from or to the airport, they will see the operator note similar to this:
When the operator select the “Airport Discount” account, the “10.0” percent automatically sets.
4. At the end of the job
When the driver finishes the airport job, SmartMove reads the fare from the meter ($42.50), automatically applies the 10% payment on account and calculates the remainder to be paid by the passenger ($38.25).
5. Reimbursing the Operator/Driver
On the Fleet Management Website, use the Operator Invoice for Account Work to determine how much is owed to the driver.
Tip 3: Adjusting Reject/Resubmit penalties for individual zones
Your fleet are able to apply different Reject and Resubmit penalties for different zones. For example, as the Board, you may decide to impose a penalty of 15 minutes for rejecting a job in the CBD zone but only a 5 minute penalty for an outer zone.decide to offer discounts for certain trips.
- Log into the Fleet Management Website
- Select the Zone Editor tool. You will see the Zone Default Properties section towards the bottom of the window

- Click on the Binocular icon
 for the relevant property. This will show all the zones and their current penalty adjustments.
- Modify the Value as normal.
- Save your changes, specifying a reason for the change.
- Repeat step 2 for the other property.


Tip 4: Adjusting Reject/Resubmit penalties for individual attributes
You can also override the fleet default penalties if drivers Reject or Resubmit jobs with certain attributes.
For example, the fleet below has encouraged their drivers to service passengers with infants better by raising the penalties for rejecting or resubmitting jobs with the Capsule attribute to 300s (5 mins).

Tip 5: Procedures for producing correct DVA invoices that includes a payment for lifts
Your DVA contract may allow you to claim a “Wheelchair Accessible Loading Taxi Fee” for DVA clients that require the use of a Wheelchair Accessible Taxi.
If you use SmartMove’s DocketKiller feature, you can claim this amount automatically.There are a few things you need to set up and a few instructions for you and your drivers to follow to get it working properly.
- Ensure you have set post codes for all the Areas within your operating region:
- Use F11 – Manage Streets Areas and Places on the Dispatch Client to enter in postcodes, e.g. ASHFORD 5553:

- Use F11 – Manage Streets Areas and Places on the Dispatch Client to enter in postcodes, e.g. ASHFORD 5553:
- Modify your “Dept. of Veterans’ Affairs” account details:
- Set the Account Includes Lift Fee Data property to “Y”.
This enables the Lift Fee? checkbox on the booking form when the DVA account is selected. If the operator ticks this, the driver doesn’t have to at the end of the job.
This also enables the Lift Fee Payable checkbox on the Fare Payment screen at the end of the job for the driver to tick if necessary. - Set the Account Lift Fee Amount property to “1500”.
This value represents $15. Note, this value may be different in your state/territory. - Set the Account Requires Reference Number property to “Y”.
This makes entering the information for DVA bookings mandatory. - Modify the Additional Account Fields property to “Appt Time (24 hr format)”.
This allows you to enter the appointment time AND the DVA Booking Number in the Reference field.
This information is used to create the DVA extract (invoice) that you can upload via the DVA portal.
- Set the Account Includes Lift Fee Data property to “Y”.
- When creating a DVA booking, with a right of return:
- Ensure the name of the DVA client is in the form of “JOHN SMITH NX987654”.
Any deviation from this will result in the DVA extract not populating correctly. - Ensure the Reference field is filled in with the Appointment Time and the DVA Booking Number:
(In the example below, the information is entered into the Appt Time (24hr Format) and Reference fields)
- Ensure the return journey only contains the DVA Booking Number in the Reference field:

- Ensure the Lift Fee? checkbox is ticked if a WAT vehicle is selected.
- Ensure the name of the DVA client is in the form of “JOHN SMITH NX987654”.
- The driver will need to indicate a that he/she helped load/unload the passenger:
- Ensure that the Lift Fee Payable checkbox is ticked, if applicable:

- Ensure that the Lift Fee Payable checkbox is ticked, if applicable:


You can then generate and save the DVA invoice in the correct format that you can then upload onto their online portal.
Tip 6: Obstacle Zones
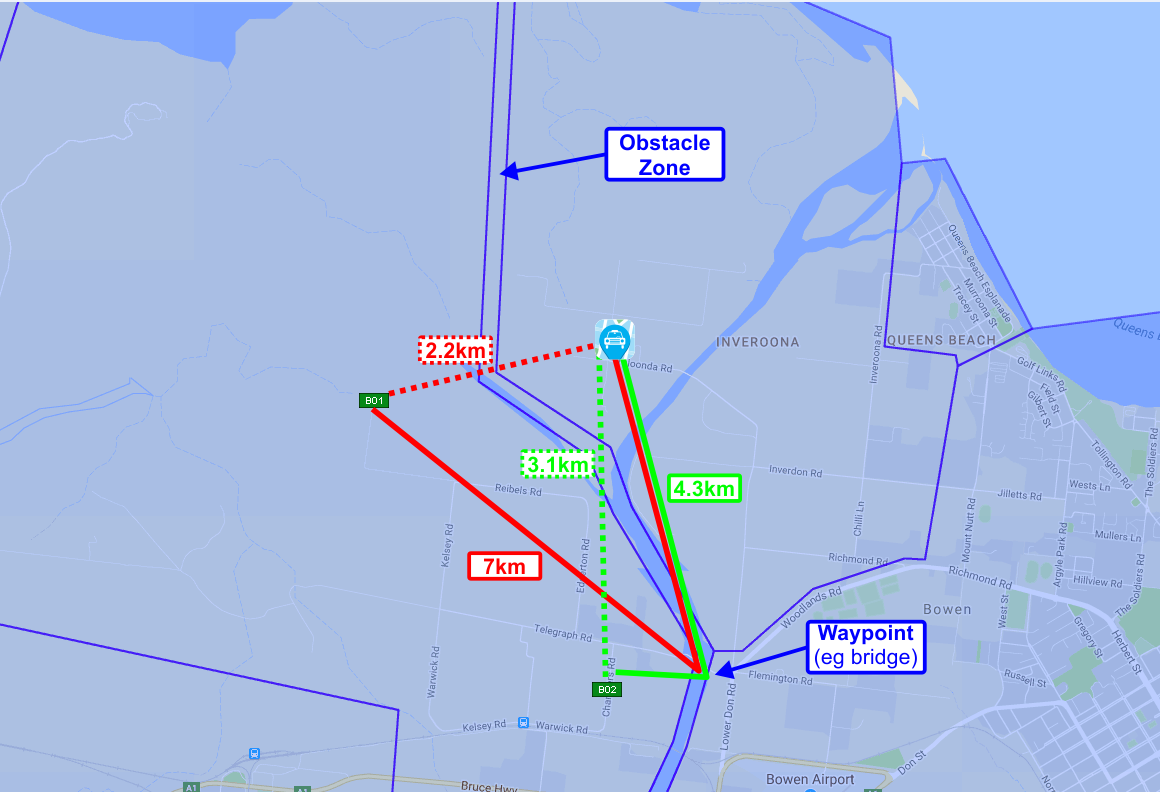
When calculating the distance a car is from a pickup address, SmartMove uses straight line distance.
This may not always be appropriate, especially in places where zones are separated by obstacles such as train tracks, rivers or mountain ranges.
For example, a car can be 2.2km from the pickup (as the crow flies), but may have to travel 7km to that pickup while another car may be 3.1km from the pickup (as the crow flies) but may only have to travel 4.3km.
Everything being equal, it makes sense to offer the job to the car that only has to travel 4.3km.
We can achieve this logic by introducing “obstacle zones” and specifying “waypoints” that the system will use when calculating distances.
The picture above (click on it to see a larger version) shows an obstacle zone following the Don River in Bowen QLD with the Russell Crossing bridge as a waypoint.
The dashed lines represents the distances the system would have used if no obstacle zones were created and the solid lines represents the distances taking into account the waypoint specified.
Setting up obstacle zones and waypoints is a little complicated so we’ll be happy to assist – just contact SmartMove Support on (08) 8238 3099 during business hours.
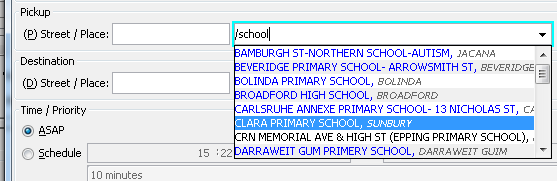
Tip 7: Contains Search Mode
If you want to display all streets/places that contains a particular word, type “/” followed by the search word and press Enter.
This will search and display all the streets/places with that word in it.
For example, you may have lots of Places in the system that contains the word “School” – “Brighton High School”, “Magill Primary School”, “Thebarton School of Languages”, etc.
If you want to display all streets/places with the word “school” in it, type “/school” in the street/places field, then press Enter.
Tip 8: Common mistakes with Recurring bookings
Recurring bookings are one of the most used and useful features in SmartMove. As Recurring bookings are generally created 7-14 days in advance (this period is configurable), here are some of the common mistakes people make:
- When creating a Model booking on the Dispatch Client, you don’t need to specify the pickup time. The pickup time is set when you create the recurring booking in the Fleet Management Website.
- If you make a change to the recurring booking, e.g. changing the pickup time or removing a scheduled day, it doesn’t affect the prebookings that are already in the system. These will have to be manually modified individually.
- If you delete a recurring booking completely, e.g. the customer no longer uses the service, it doesn’t affect the prebookings that are already in the system. These will have to be deleted individually.
- If you make a change to the the model booking, e.g. adding another pickup on the school run, it doesn’t affect the prebookings that are already in the system. The additional pickup will have to be manually added to all these bookings individually.
Tip 9: Send email reminders to Owners/Operators when Requirements are nearing expiry or have expired
Drivers and vehicles are governed by a host of regulations. In many cases a licence or authority of some sort is required to operate and often these have expiry dates attached to them. As a reminder, the term Requirement is used to describe a licence, authority, permit, or anything else that might effect the operation of a vehicle in the fleet.
When you create a Requirement that applies to vehicles, you can specify the email address of the owner/operator so they receive warning messages too. For example, if the vehicle registration is nearing expiry, an email will be sent to them so they are reminded to renew the vehicle registration.
Use Vehicle Management to modify the Vehicle Owners Email Address for each vehicle.
Tip 10: Apply penalties for rejecting and resubmitting jobs offered via cover
Generally, a driver will incur a penalty if they reject or resubmit a job that was offered to them via zone layering. They don’t incur a penalty if the job was offered to them via cover. See the Dispatch Algorithm Guide for a better understanding of “layers” and “cover”.
Some fleets have requested that penalties apply to cover jobs to discourage drivers from selecting inappropriate cover distances. It has been reported that some drivers select “Any” cover distance so they can be offered all jobs and pick and choose those that appeal to them. This sometimes delays the passengers from getting picked up, especially if the driver is Out-Of-Car.
If you set the fleet property Penalty For Cover Jobs to “Y” a penalty will apply if the driver rejects or resubmits a job that was offered via cover. The penalty periods that apply are those set by the Penalty Reject and Penalty Resubmit properties.
Note though, if a driver “resubmits with change” and they are within the distance specified by Resubmit With Change Distance property, they will not be penalised.
Tip 11: How to give “duty” cars first dibs at jobs
Your fleet may have duty car(s)/driver(s) to whom jobs should be offered first. If the duty car(s)/driver(s) are not available for work then the job can be offered to other cars working at the time.
You can implement this policy if you have our SmartVOIX* phone system, or use a Call Centre that utilises SmartVOIX. The basic steps are:
- Create a “Duty Car” (or some other similar name) attribute that applies to a vehicle or driver.
It is advisable to set the Attribute Timeout field to say, “300” seconds. What this will do is remove the “Duty Car” attribute from the job after a period of time to ensure that the job gets done in case the duty car is still unavailable. - Apply the “Duty Car” attribute to the appropriate vehicles/drivers (usually this is applied to all vehicles/drivers).
- Contact Support via email or phone us on (08)82383099 and request that all phone bookings have the “Duty Car” attribute applied.
- When the drivers log in, the drivers that are not on duty should un-tick the “Duty Car” attribute. The duty vehicle(s)/driver(s) should leave the “Duty Car” attribute ticked.
In summary, when an operator creates a booking, the “Duty Car” attribute will automatically be applied. The attribute will automatically be applied to IVR bookings too. The job will offered to vehicle(s)/driver(s) with the “Duty Car” attribute ticked. If the job is waiting after the Attribute Timeout period, the “Duty Car” attribute is removed automatically and the job is offered to the most appropriate car.
*SmartVOIX is an IP based office phone system designed and developed in-house to coexist with the SmartMove. It provides features such as screen-pops based on caller ID, call recordings linked to bookings, IVR automated bookings and detailed statistics to help with rostering.
Tip 12: Email SPF Record
SmartMove attempts to send emails on your behalf for items like Booking Confirmations and Account Invoices.
Unless your email domain settings (DNS) have appropriate information included these emails can frequently be marked as SPAM by the receiver of the email.
To overcome this, we can utilise a SPF record (sender policy framework) in your Domain Name settings; it is a simple TXT record:
https://en.wikipedia.org/wiki/Sender_Policy_Framework.
To allow SmartMove to send on behalf of your email domain, you should include us in your SPF record by adding the networks shown below:
v=spf1 mx a
You generally do not need to understand this, just forward it on to the person looking after your computer network to sort out.
Tip 13: How to search for jobs that took a long time to service
Fleet Managers may want to investigate reasons as to why jobs take a long time to service, that is, jobs with a long response time and want to search for all bookings that took > ‘x’ minutes to service. Lucky we have a Custom Report for that!
Search for an execute the “Response time booking search with Attributes and Reject/Resubmitted count” custom query and fill in the relevant fields.
The resulting table will list all the jobs that took over x minutes from the booking request time to when the customer was picked up.
You can order the response time by clicking on the RESPONSE column header.
If there is too much info, you can always hide some columns by clicking this button  and (de)selecting relevant fields:
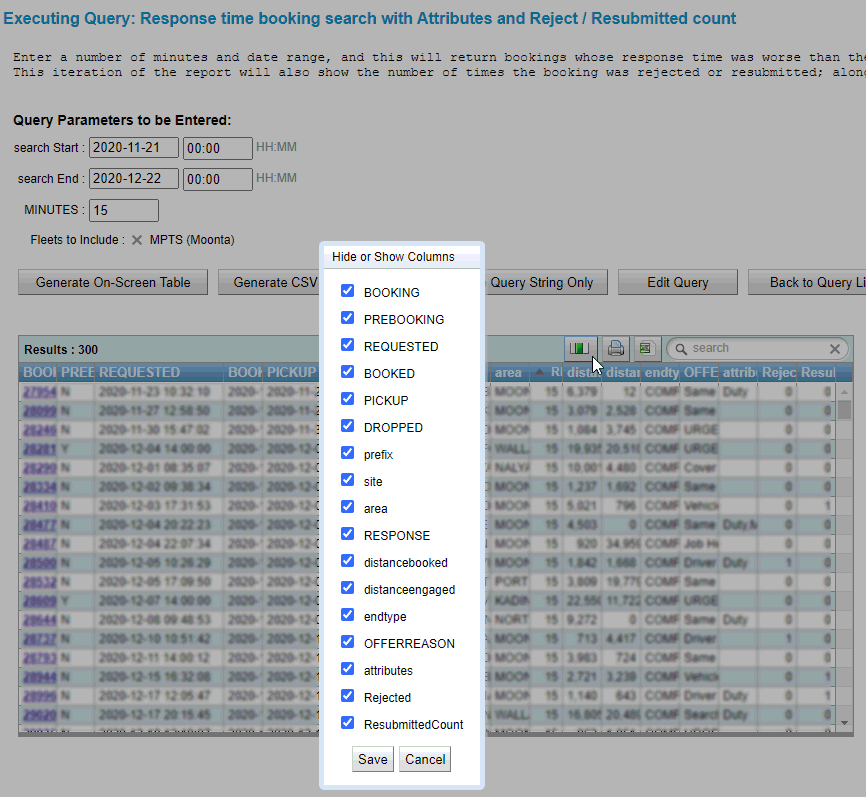
Remember that you can click on the booking number which will open up a new tab with the Booking Details report for that booking.