The menu bar at the top of the dispatch client contains a number of options that allow the Operator to navigate to different screens or to perform actions that are less common. The following describes these options in more detail with references to the documentation where more information can be obtained where applicable.
File Menu
The file menu has the following options:
Settings
The Settings dialogue consists of three tabs which allow the Operator to customize certain fields in the New Booking dialogue, configure the SMS unit and configure Messaging settings.
All settings are saved when the Save button is pressed. Some changes take effect immediately while others require the Dispatch Client to be restarted (the Operator is informed which ones). The settings will apply for the computer the Dispatch Client is installed on so all Operators using the same computer will have the same settings applied.
Booking Screen
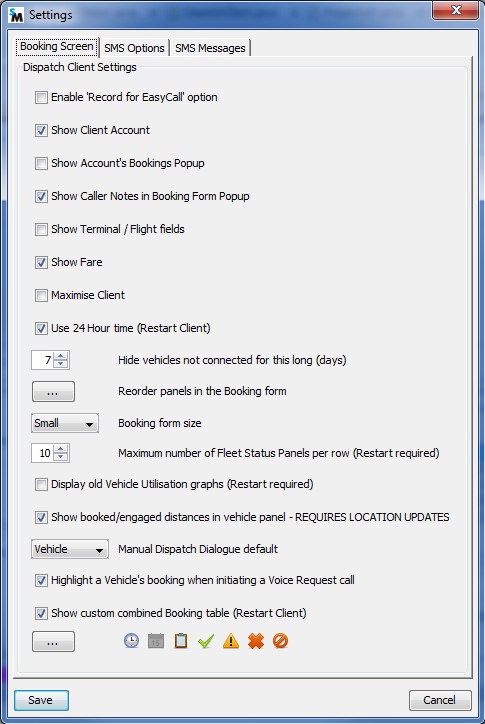
Settings Booking Screen
Enable ‘Record for EasyCall’ option
EasyCall is a feature that is incorporated into the SmartVOIX product that facilitates automatic phone bookings (no assistance from the Operator). When selected the New Booking dialogue will display an extra field in the Client identity section allowing the Operator to register the incoming phone number for EasyCall.

Note: Changes takes effect immediately.
Show Client Account
When selected the New Booking dialogue will display three extra fields in the Client identity section allowing the Operator to enter the billing details if the client is an account client. If account information is entered, the driver will see that information on the Fare Payment screen at the end of the job.

Note: Changes takes effect immediately.
Show Account’s Bookings Popup
Used in conjunction with the Show Client Account option, when selected, the New Booking dialogue will display a popup that shows all the current and Model bookings for the selected account.

Note: Changes takes effect immediately.
Show Terminal/Flight Fields
When selected the New Booking dialogue will display two extra fields in the Pickup and Destination sections allowing the Operator to enter the flight details which will be displayed to the Driver as a driver info message.

Note: Changes takes effect immediately.
Maximise Client
When selected the Dispatch Client window will be maximised to fill the monitor screen, otherwise it will start up being 1024 x 671 pixels in size.
Note: Changes takes effect immediately.
Show Fare
When selected the New Booking dialogue will display the Distance/Fare section. This section can be used to estimate the fare based on the pickup and destination locations.

Note: Changes takes effect immediately.
Use 24 Hour time
The Dispatch Client can display time in 12 hour (e.g. 8:34pm) or 24 hour (e.g. 20:34) formats. If this option is selected, all times will be in 24 hour format. If deselected, all times will be in 12 hour format.
Note: Requires the Dispatch Client to be restarted.
Hide vehicles not connected for this long (days)
The number of vehicles displayed in the Vehicle dropdown list of the New Booking dialogue and the Vehicle Status list of the Dispatch screen may be reduced by removing (hiding) those have not connected for a certain number of days. This reduces clutter.
Setting this value to be 0 will display all Vehicles.
Note: Requires the Dispatch Client to be restarted.
Reorder panels in the Booking form
The sections (panels) within the New Booking dialogue can be rearranged to the Operator’s preference. The section at the very top displaying the fleet name and section at the very bottom displaying the shortcut keys are fixed.

To reorder the sections, simply drag that section to another position. Click OK when done. The Default button is used to restore the sections to the original order.
Booking form size
The New Booking dialogue can be displayed with longer fields for entering more information in, The difference between Large and Small is shown below:


Maximum number of Fleet Status Panels per row
If the Operator can dispatch for multiple fleets, the fleets are displayed in the Fleet Status panel (immediately under the Menu bar). This setting allows the Operator can specify the maximum number of fleets that are displayed in each row of that panel.

Hint: Don’t set the maximum too high otherwise you may not be able to see the full name of the fleet if the name is long.
Note: Requires the Dispatch Client to be restarted.
Show Booked/Engaged distances in Vehicle panel
With this setting on, the straight line distance of a car from a job will be shown in the Vehicle Status panel. If the vehicle is Booked, the distance shown is to the pickup location. If the vehicle is Engaged and a destination address was entered in the booking, the distance shown is to the destination.

To use this feature you will need to set a value for the Fleet property Vehicle Location Period. This value represents how often you wish to see location updates.
Hint: A low value for the Vehicle Location Period fleet property will increase internet download usage. So monitor your internet usage when implementing this feature.
Note: Changes takes effect immediately.
Manual Dispatch Dialogue default
When manually dispatching a job, the Operator can dispatch it to a driver or a vehicle. The Manual Dispatch dialogue allows the Operator to see which drivers or vehicles are eligible to do the job. This setting defaults the drop down list to be either the list of Drivers or the list of Vehicles.

Note: Changes takes effect immediately.
Highlight a vehicle’s booking when initiating a Voice Request call
If a driver makes a voice call request while they are doing a job, when the operator initiates the call, the job that the driver is currently doing is highlighted and on the Dispatch Client is this option is selected.
Note: Changes takes effect immediately.
Show custom combined Booking table
It is possible to add another Booking queue table with selected booking states (e.g. Cover and In-Progress).
Note: Requires the Dispatch Client to be restarted.
SMS Options
These settings configure the Global System for Mobile communications (GSM) unit for use with the Dispatch Client. The GSM unit allows the Dispatch Client to take bookings via SMS.
Note: These options are only relevant to a fleet that has a GSM unit connected to the machine that the dispatch client is running.

GSM Unit Attached
This option specifies whether a GSM unit is attached to the computer the Dispatch Client is running on. The Dispatch Client will attempt to communicate with the GSM unit upon start up.
Note: Requires the Dispatch Client to be restarted.
Com Port
The communications port the GSM unit will communicate on. By default this is Com 3 but check the GSM unit device settings if the Dispatch Client can not communicate with the GSM unit as the port may have been manually changed during installation.
This field will only be enabled if the GSM Unit Attached option is selected.
Note: Requires the Dispatch Client to be restarted.
Accepting SMS Bookings
This setting specifies whether the Dispatch Client will accept bookings made via SMS. When this option is selected, the will display the SMS Bookings area at the top of the Dashboard screen.
Note: Requires the Dispatch Client to be restarted.

Response
This setting specifies the confirmation action taken when the Operator creates a new SMS booking. These options include:
- None: do not take any action.
- SMS: attempt to send an SMS (message configurable) to the sender for the period specified in the Send Timeout setting. The Operator will not be advised if the confirmation SMS was sent successfully or not.
- Ring Phone: attempt to ring the number of the sender and hang up after a period as specified in the Hang Up Delay setting. As part of marketing, clients should be informed that if they receive a call from the GSM unit, it implies their SMS booking was successful. Moreover, clients should be informed they should not answer the calls from the GSM unit.
- Hang-up Delay (sec): the number of seconds the GSM unit will attempt to call the client that placed the SMS booking and then hang up. Note that a consequence of a delay that is too short is the call may not be made and a consequence of a delay that is too long is the client may pick up the call, costing the call centre the cost of that call (flag-fall + call cost). Experimentation with the delay is advisable. This field is enabled if the Ring Phone option is selected.
- Send Timeout (sec): the GSM unit will continuously attempt to send the confirmation SMS for this amount of time. If the GSM unit can not send an SMS during this time (e.g, mobile network outage), it will not try again.
Note: Requires the dispatch client to be restarted.
SMS Messages
These settings customise the SMS messages that will be sent by the Dispatch Client in response to an SMS booking. The number that is displayed in the Caller field of the SMS Bookings section will be the number used to send the SMS to.
The fields are editable when the Response is set to SMS. Press the Save button to save any changes.

Taxi Booked
The confirmation SMS message sent on successful booking. This field is only enabled, and the message sent, when the Response is set to SMS under the SMS Options settings. The SMS message will be appended with “Your reference is XXX”, where XXX is the booking id.
Town Required
This message is intended to inform the client that they need to specify a town in their SMS booking request. This is so that the Operator can select the appropriate Fleet to place the booking. This message will be sent if the Operator presses the SMS Reply button in the SMS Bookings frame and selects the TOWN REQUIRED option.
Address Not Clear
This message is intended to inform the client that they need more detail in their SMS booking request. The message should include an example of a valid SMS booking request message. This message will be sent if the Operator presses the SMS Reply button in the SMS Bookings frame and selects the ADDRESS NOT CLEAR option.
Politeness Warning
This message is intended to inform the client that they should not use offensive and aggressive words in their SMS booking request. This message will be sent if the Operator presses the SMS Actions button in the SMS Bookings frame and presses the Warn Sender button in the SMS Action dialogue.
Number Banned
This message is intended to inform the client that they have been banned from making an SMS booking request from that particular phone. An Operator may decide to ban SMS booking requests from a certain phone due to continued aggressive or abusive content. It is up to the discretion of the Operator. This message will be sent if the Operator presses the SMS Reply button in the SMS Bookings frame and selects the Ban Number button in the SMS Action dialogue.
Note that at this time, the banned number is not recorded or flagged as being banned. SMS booking requests may still be processed by another Operator if the banned number is not relayed to the next Operator.
Send Logs
If the Operator discovers faults or they see some anomalies on the Dispatch Client, they can send a report to Support using this menu item. Selecting this menu item will display the Send Logs dialogue where the Operator can enter details of the fault.

The fields are described below:
- Email: enter a valid email address that Support can reply to. This field is mandatory.
- Note: enter a note describing the problem in as much detail as possible. This field is mandatory.
When the Operator presses the OK button, the Dispatch Client will take a screen capture of your screen(s), creates an email attaching the screen captures and client logs, then sends that email to Support.
Clear Cache
In the event that the Dispatch Client is using corrupt data, this menu item can delete the data files in the cache directory and clear all the Dispatch Client settings. The data files contain a local copy of the street data and the configuration file contains the operator’s settings (e.g panel layouts). Selecting this menu item will display the Clear data cache dialogue:

When choosing to clear the cache, the operator can:
- Clear this Fleet’s cache only: clear the street data for the currently selected fleet.
- Clear All Open Fleet’s cache: clear the street data for all the fleets in the Fleet Status panel.
Note: Requires the dispatch client to be restarted.
Exit
Selecting this menu item will shut down the Dispatch Client. The operator will see the Close Dispatch Client confirmation dialogue
Booking Menu
New (F2)
Selecting this option will bring up the dispatch booking dialog so that a new booking can be created. Pressing the F2 button will do the same.
Manage Addresses (F11)
Selecting this option will bring up the manage addresses dialog so that streets, areas and places can be added or changed. Pressing the F11 button will do the same.
Messaging Menu
Messages (F3)
Selecting this option will change the selected dispatch client tab to be the Messages Tab. Pressing the F3 button will do the same.
Alerts (F4)
Selecting this option will change the selected dispatch client tab to be the Alerts Tab. Pressing the F4 button will do the same.
Drivers Menu
Reset Password
Selecting this menu item will display a dialogue that allows the Operator clear a Driver’s password so the Driver can log into the Vehicle. This is useful when the Driver has forgotten their password and the Operator do not have the ability to change a Driver’s password using the Fleet Management facility.

Only Drivers in the current Fleet will be listed in the drop down list. Select the appropriate Driver from the list then press OK. A confirmation dialogue will be displayed asking for confirmation. Press Yes to clear the Driver’s password or No to dismiss the dialogue.

Dispatch Lock/Unlock
The Operator has the ability to lock a Driver from getting automatically dispatched jobs. An example where this may occur is when a Driver continues to work during their rostered time off.
Selecting this menu item will display a dialogue that allows the Operator to select which Driver to dispatch lock.

Only Drivers in the current Fleet will be listed in the drop down list. Select the appropriate Driver from the list then press OK. A dialogue box will then be displayed asking the Operator to enter a reason for dispatch locking the driver and an expiry time if applicable.

Enter the reason then press the OK button. The selected Driver will no longer be dispatched jobs.
A Driver may be unlocked by selecting the Driver in the Taxi Status table and selecting the Dispatch Unlock right-click menu item.
Operators Menu
Reset Password
Selecting this menu item will display a dialogue that allows the Operator to reset another Operator’s password. Their current password will be cleared and set to the password the Operator enters next time the Operator logs in. This is useful when another Operator has forgotten their password.

Only Operators in the current Fleet will be listed in the drop down list. Select the appropriate Operator from the list then press OK. A confirmation dialogue will be displayed asking for confirmation. Press Yes to clear the Operator password or No to dismiss the dialogue.

Note: resetting an Operator’s password will only work if the Fleet allows this to happen (a Fleet attribute in the database).
Admin Menu
Enable Driver Away for all Vehicles
The Out-Of-Car function is a feature in the system that allows Drivers to be away from their Vehicles when they are waiting for a job. For example, they can have lunch in a café, or read the paper under a tree without the fear of missing a job. The system will “prank” the Driver’s mobile phone when a job is dispatched to them and will allow them typically 1 minute (as opposed to the standard 15 seconds) to accept/decline the job.
If this menu item is selected the Out-Of-Car button will be enabled on the vehicle devices for the whole Fleet. The use of this menu item will depend of the Fleet policy.
Disable Driver Away for all Vehicles
Selecting this menu item is selected the Out-Of-Car button will be enabled on the vehicle device. The use of this menu item will depend of the Fleet policy.
Switch Mobile Providers
Some devices used in the vehicles have dual SIM cards and have the ability to automatically switch from one mobile network provider to another if there is a problem with one. An example where this may occur is a Vehicle may be configured to use the Vodafone and Telstra networks and currently using the Vodafone network in one zone and driving into a zone where the Vodafone network is down. In this situation the device will automatically switch over to the Telstra. The Operator may instead want every Vehicle in the Fleet to use the Telstra network and this can be done via this menu item.
Request All Vehicles use Network
Selecting this menu item will force the vehicle devices in the Vehicles to switch to the specified provider. If the vehicle device does not have access to the specified provider, the device will not switch.
The Operator can verify which network the Vehicles within the Fleet are using by viewing the Taxi Status table.
Edit Fleet Properties
If the Operator has the Edit Fleet Properties in Dispatch Client authority, they are able to edit certain Fleet Properties normally only editable by Fleet Managers with Web Admin access.
The available Fleet Properties are:
- Use Closest Car For All Bookings
- Force NoLoc Jobs When Attribute Deselected
- Phone Number Voice
- Phone Number Panic
